
- This topic has 60 replies, 10 voices, and was last updated 7 years, 6 months ago by
randr.
-
AuthorPosts
-
August 2, 2016 at 11:04 pm #34194
3/16” is standard, so a little under 5mm. And that’s just plain tempered glass, none of that fancy Starfire optically clear stuff,(what ever that is) nor polished edges.
I do tend to over-engineer things somewhat. lol
I use “optically clear” glass for my landscape images, as it has zero colour cast and therefore wont effect the image. So when it came to the pinnie, I just figured “why the hell not?” :)
You need to login in order to like this post: click here
August 3, 2016 at 12:46 am #34197Thanks yeah, that’s the joy of making it yourself I suppose .. want to make it a bit different, no probs, want to make it shorter, no probs .. just have to work out how.
hehe, the glass cost is like one of the cheapest bits so far contemplated ! :) if it’s a couple of hundred bucks but is clear and safe .. I’m in for it .. optically clear makes sense is that tempered as well ? & shortening rails shouldn’t be a challenge .. it’s everything else that will be the challenge
Yes, I think I will shorten a bit and I like the screen closer to the player I think .. I’ll dummy it up before I go too far, and perhaps bring any spacing towards the back, I can fill the area at the back with flashers I think or similar .. or nothing as it will be a bit experimental.
Cheers for the input,
al.

You need to login in order to like this post: click here
August 3, 2016 at 5:58 pm #34212Yes Starphire (I’ll spell it correct this time) is a safety glass, as it is used for all the usual “must be safe” areas. See… http://www.ppgideascapes.com/en-US/Glass/Products/Starphire-Glass/Interiors.aspx
re the additional cab space …. rather than shorten the cab, or add a filler at the top of the screen, some have chosen to use the extra space for MAME arcade controls.
While my cab is a custom build and I am not using a traditional lockdown like yourself, I have included MAME controls in my custom lockdown. I gotta say, it rather nice it being an arcade gamer as well…. just something to consider.
You need to login in order to like this post: click here
August 3, 2016 at 7:48 pm #34215Nice idea, I have built a horizontal old school arcade monitor arcade already .. the idea of a vertical mame screen is both intriguing and appealing .. Hmm .. one step at a time however. The glass is cool, I think that is what our recent shower screen is, it’s tempered, clear clear and has blue edges..
I had all hells delight last night and wasted one of my very few free evenings on setting up software on the new box which, I have working beautifully on my desktop, but bugger me I couldn’t even get a game operating , obviously I’ve overlooked something, so I need to step back, go fishing with the boys for the weekend, and then come back and approach it methodically. ( I will also change my desktop video card and cable to the pinny as the playfield screen doesn’t look really crisp. ) and as I’m still saving for bits and pieces I have plenty of time, so all good.
I’ve decided I will go DOF, but that will take some time, so, at the very least I will wire for it, or at the very best I might just buy the generic Zebs all in one job done kit, as that seems _almost_ a more economical option, based on some of my initial ebay searches and local enquiries, and with enough hints my wife can buy it for me as a birthday present ..
Anyway, time to go and pack some warm clothes, and some internal heating liquids, find the tent, tackle the mess in the workshop to find my fishing gear, cut some firewood and head to the beach.
Cheers,
al.
You need to login in order to like this post: click here
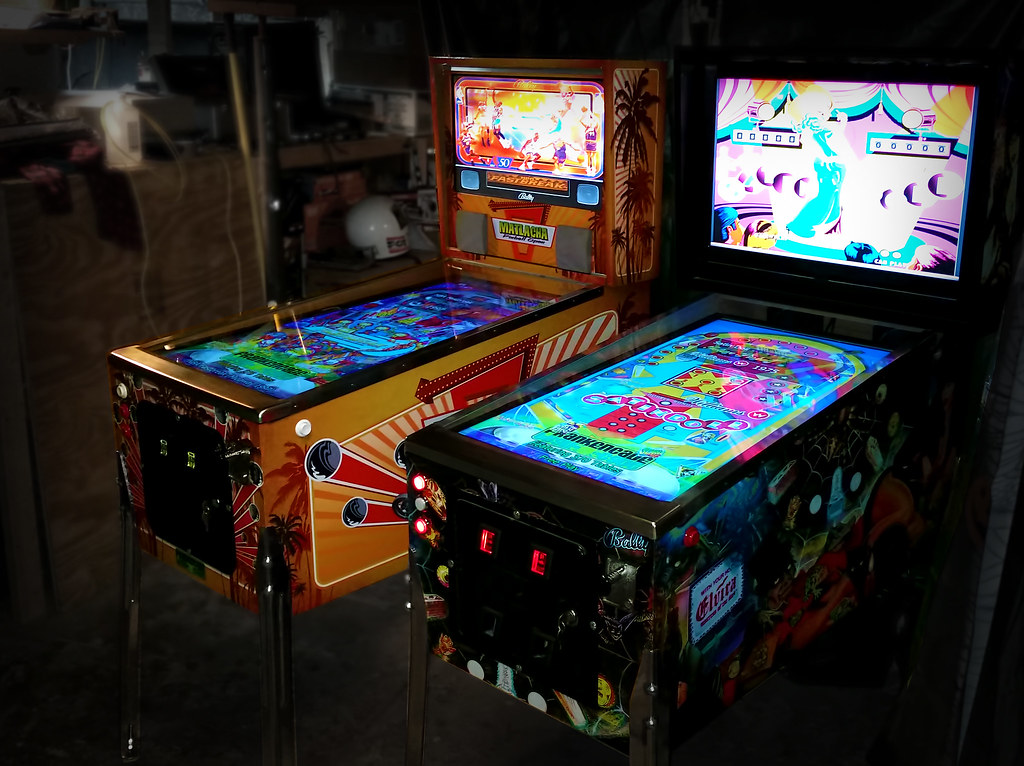
August 4, 2016 at 2:44 am #34227when i built my cab it was all budget motivated, and a mission to see kinda how cheap i could do it and it not look like a shit box
its a 2 screen 40″ 28″ setup custom built cab to match the size of the PF tv… and it uses a standard size lockdown bar $20…
it is about 7″-8″ shorter than a standard pincab… I wanted it to have no gaps at all plus when look for the used PF tv it was most important to me to find one the right width to work with the lockdown… I fould a the tv at a pawn shop for $75 (RCA LED 1080) …. again i built the cab to the size if this TV
the BG tv i got off craigslist for $50 ….. the computer is a mish-mosh of parts i had and just had to buy the video card less than $100 (GTX760ti)
my nudge/plunger/button controller is a DIY pinscape $75-ish…. oh and I fould old used legs on ebay $25 and polished up close to perfect…
my rails are angle aluminum that was filleted (rounded) and polished to a mirror like shine $10
buttons and leaf switches, power supplies, cables, wires , blah blah blah… couldnt tell ya.. $50-$60 who knows…
vinyl graphics , free (I was in the sign industry for over 20yrs and have lots of favors owed)
so building one cheap is way possible if you want to put the work in… it only took me two months or so to collect all the crap
you can build these things without braking the bank, and it still look desent…. oh I dont DONT have DOF installed yet, but soon I have all the parts, and was taught by a VERY wise man that again this doesnt need to be over thought or over bought… meaning it can be done on the cheap as well
heres pics and a video
You need to login in order to like this post: click here
August 8, 2016 at 5:46 am #34459That’s just made things very easy :) stunning cab seriously blows me away and just how I picture it in my head. All advice now well stored I just found an old touchscreen monitor in the shed that may become my dmd if I can get it working. Back glass shouldn’t be too hard and I’ve been watching you tube on how to polish aluminium for rails as I’ve got a bit of angle about the place. The drawback of being in Australia is availability of second hand legs, coin doors etc as the population of old pinnies just isn’t here. But if it costs a few bucks for some of it, so be it. Today I purchased some mdf. I’ve started getting the software installed while I wait for the plunger and bits to turn up then it’s decase, build to suit (basically a short standard body I think) .. There’s no turning back now.

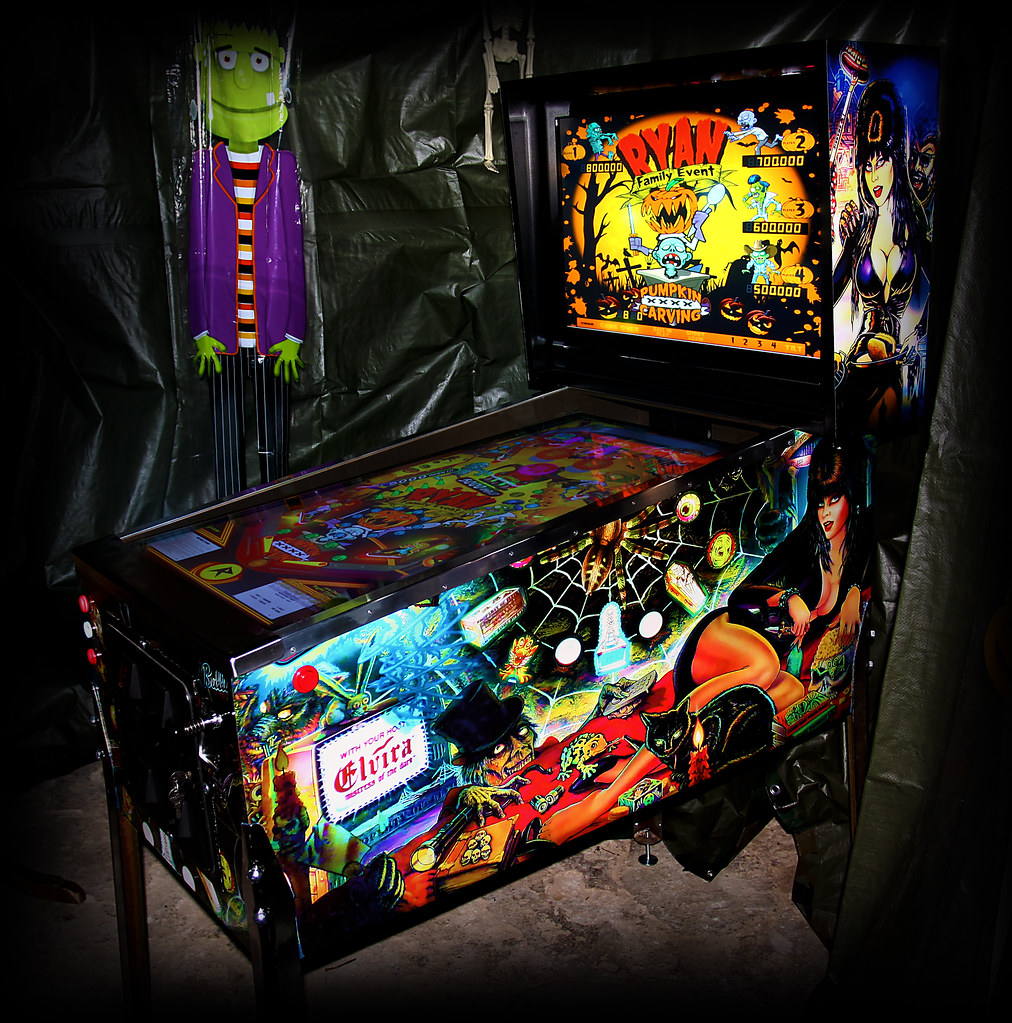
vinyl makes them though so I’ll put that on the purchase list your elvira is beautiful.
Cheers,
al.
You need to login in order to like this post: click here
August 10, 2016 at 12:49 am #34499Legs ordered today, damn they are expensive for what they are .. along with some internal corner brackets for them to bolt up to for ease, thought about table legs in the interim .. but life is short :)
Started cleaning up the old coin door I have too, so I think that will be suitable. ( it has a couple of reject coin buttons so I think I can work out how to use them for credits, although I did dream of having a stack of 20¢ pieces about the place to play with.. )
I’m still waiting for the plunger kit and some buttons, and I might even have a night off from my elderly mother in law, so .. tonight I plan to finish up configuring hardware and starting on software, and probably decase big screen if I get it finished, so I can measure up and mark out some MDF over the coming nights ready for cutting all going well.
Cheers,
al.
You need to login in order to like this post: click here
August 10, 2016 at 4:02 am #34500For the coin reject buttons, i mounted a microswitch behind each to map to a credit button. Arm from the return hits the microswitch.
You need to login in order to like this post: click here
August 10, 2016 at 6:13 pm #34544Yeah cheers, I had thought something similar, I think I need to mount my switches at 90° as the reject button just “spreads open the chute” there’s enough movement there though ( and I still haven’t cleaned it up ) and an extension arm on the micro switch ( like a coin one ) will work a treat .. I think :) I can make up a little bracket without too much stress. My biggest issue at the moment is measuring and modifying everything to make sure it’s modular, I’d like to change the coin door into the future with a decent one, and I’d like to upgrade the screen already to UHD, but can’t afford it just yet .. as well as making provisions for future DOF .. at the end of the day I feel like I’m going to end up with 2 cabs in the future .. :)
Oh and so I decased ( well dropped off the back cover really on the screen, and then realised it is LED ), so The little frame is all that is holding it together, a bit of dremel work and I had the little back cover cut down and modified, TV speakers loose and removed, and back cover back on. I’ve modified the plan now, and will mount on the VESA bolts onto a frame on a hinge, so I can pivot the screen up and out of the way. I’ll modify the cabinet plans to suit, and if I can’t find a suitable trim for the side of the screen, might even go smaller than standard width. Current cab dimensions are about 540 wide and about 1200 long ( about 21″ x 47″ roughly )
At this stage pre mock up .. I’m running with a 200mm ( ~ 8″ ) deep backbox, the screen which is 900 ( ~36″ ) long will fit basically where ever the lock bar ends on a slight angle to improve the viewing angle to about 100mm ( ~4″ ) short of the front of the back box, so there is room for a couple of flashers or something similar once I DOF it up.
Back height of the cab box will be either 500 to 600 ( ~20 to 24″ ) front height of the cab will be 400 (~16″ )
A couple of questions I have are .. how high are cabinets usually / average ? from the floor to the underside ? which will determine where the legs mount, and at what height should the flipper buttons be ? I’m working on what feels about right at this stage ( weird how muscle memory got the width just about smack on :) .. It’s the only muscle I’ve got .. ) and it feels like it should be about 900mm / 36″ to the flipper buttons maybe a smidge more.
Cheers,
al.
You need to login in order to like this post: click here
August 12, 2016 at 12:30 am #34612Another question .. Is there any benefit to running 3 screens over 2 screens ?
I’ve got 3 I can run 3, but I’m thinking the backglass with speaker image and DMD on top is probably as effective as a separate screen with dmd and physical speaker mount .. and then some of the old school back glasses would fit and look better .. and if it was a big enough screen running vertical through the back glass I can position the DMD to overlay .. or I can do a physical speaker surround and underlay the backglass and DMD to align it .. ( I’m assuming these are all do able things as I’ve not tried !)
or stick to 3 screens, one for DMD, do a physical cut out for it and run the backglass display separate over 3 screens ..
Last night I discovered media packs after setting up a few in PX with individual images .. so heads up anyone starting out .. media packs are the f-bomb .. this week I’ll get some timber cut and start work on the coin door while i still wait for my plunger kit to arrive .. I think, other than the display conundrum, I have the basics of the software down pat now and can resolve most startup errors etc.
Another Question .. most of the backglasses have the speaker image on them, but a lot of people have 3 screens and I guess either crop the speaker part from the back glass or extend the display beyond the bottom by the appropriate amount to hide it .. ? assuming I go 3 screens as I had planned, how the heck do you do it ?
is that done with the lines i haven’t used in the screenres.txt files ??
Cheers,
al.
You need to login in order to like this post: click here
August 12, 2016 at 7:16 am #34613Right click on backglass with table running and click hide speaker panel. If you can run 3 screen I would as it results in best emulation of newer pinballs looks like the real deal. 2 screens work fine but you really should have 3
********************************************************
Messing with the VPinball app and push notifications.
So if you haven't downloaded app yet what are you waiting for!?
for IOS and Android********************************************************
You need to login in order to like this post: click here
August 12, 2016 at 2:18 pm #34624I’d go 3 screens or 2 + a ‘real’ DMD. I went the ‘real’ DMD route but ended up with a pinDMD3 rather than a Vishay Plasma DMD. I had a 3 screen cab in the past and missed the look of a real DMD so when I built my current one I went that direction. I’m not completely regretting my decision but I will say that I am loving BorgDog’s build and I believe and argument could be made that a 2 screen setup when using a wedge head cabinet design is certainly a great way to go. The Star Wars backglass he made looks totally bad ass on his setup compared to the stretched non-original-aspect-ratio my setup is turning that backglass into. So my current thought is if you’re going 90+ WPC cabinet build go 3 screens, but if you’re going old school wedge-head go two :)
You need to login in order to like this post: click here
August 14, 2016 at 8:04 pm #34690Thanks, you’ve helped. I’ll go 3 screens, I have them there, and now have them configured.
I think I’ve already decided this will be pin cab one of two .. I think next one will be 2 screens, like BorgDogs beautiful starwars build, and I’ll run it for all the older non DMD tables. I kinda like them a lot, so I’ll fleckky retro paint spatter the next one, this one will get vinyl, all the bling and a DMD if I can save enough for it, or at the very least a 3rd screen in the interim until I can afford it.
Cab shell is basically built,


back box to go now I have a direction with screens. I still need to work out the coin door now, as this is a more modern of the two I think my old refurbished one might be better in the next one. ( WAF ( wife approval factor ) is high on the second build :) and I have preliminary approval ) So I’ll have to hunt up a more modern coin door, the legs should be here this week, there is a delay on the plunger and nudge board from ozstick/zebs but thats cool, I have the main software set up and running .. just getting sick of playing with a bloody keyboard !
Screen as decased as needs be ..

Now it’s just time to collect parts again I think
Thanks again,
Cheers,
al.
You need to login in order to like this post: click here
August 14, 2016 at 8:12 pm #34695Looking good… my pin sat in that state for far too long, I wish you speedy progress :)
I’m considering a second one too but I’m really close to picking up another real pinball machine. My WAF is dropping quickly!
You need to login in order to like this post: click here
August 14, 2016 at 8:31 pm #34698Naar full steam ahead for me, we are renovating at the same time, so if I hesitate I won’t be able to hide costs amongst renovation costs

It’s now devoid of internal braces, marked out, has a false screen in it so I can position things, and is well screwed ( well, I like to think so anyways ) and is as solid as. Hopefully this week I can get the rest of the messy cutting done and then get it inside to keep going with ..
Which real one are you looking at ?? how excellent, I’ve dreamed of one, but just haven’t found the right one yet ( read as -> cheap and needing minimal work ! ) I saw a dude on one of my searches building a real pinny from scratch, I would consider that a life time undertaking ..
Cheers,
al.
You need to login in order to like this post: click here
August 14, 2016 at 9:01 pm #34699I was out of the hobby for about 10 years and I picked up a Silverball Mania a couple of months ago and now I’m looking at a Bobby Orr Power Play in some serious need of TLC. You wouldn’t even recognize it. I’m a fan of late 70’s/early 80’s Bally’s.
You need to login in order to like this post: click here
August 16, 2016 at 1:21 am #34735Awesome, being ‘ of that age’ i worked in an arcade from about 10 to 14 years old .. Silverball mania was later than my time there I think, but it had a ‘busy’ playfield yeah ? I had to google the powerplay, but that looks more like my time :) ( Just checked on silverball mania too, and although it’s not exactly as I remember it, it is busy, and I reckon that was in our local fish n chip shop or pizza store for a bit, it’s too familiar! )
Good luck with giving it some love, I’m sure it deserves it :) Is there a thread where you step by step the process ?
So I’ve got legs on order, nudge kit and plunger on order, I was lucky enough to get hold of a DMD / speaker panel at a good price so i don’t have to fab one ( circles are not my forte ) still looking for a coin door, I have an electrical contractor here at work, that reckons he has a bunch of unneeded 24v solenoids .. ( yey ) so if that proves correct I might just as well get a board and run some basic dof with a knocker and some solenoids, vinyl i will wait till toward the end, i have a controller board for an old laptop lcd on order for the DMD which I’m pretty happy about, all I really need to get to keep the ball rolling now is a 32″ which I’ve found I think so hopefully this weekend I can slip out and pick that up .. I think that is about it, a little stasis as I wait for bits to arrive, but in the mean time, propped up on the carcass of out ensuite cabinetry which I still have to fit, I’m trying to get pinballX to work without throwing up script errors even though they run fine manually .. so that might be the coming nights adventures !
Cheers,
al.
You need to login in order to like this post: click here
August 16, 2016 at 4:36 am #34739Hi Al
if you need some help give Chris a ring at OzStick he is a very knowledgeable guy helped me out quite a bit. As for LCD’s remembering memory state I got my brother to wire up all 3 screens to a Pc dip switch… the only one that remembered its power state was the 15″ DMD. As my pinball is custom i went away from the Lock down bar and got a guy here in Darwin to make me a custom one for $50. all the best with your build Al
You need to login in order to like this post: click here
August 16, 2016 at 5:45 pm #34749Yeah Chris is supplying my nudge / plunger kit. Must just be me that orders stuff that isn’t readily available ! but his communication is impeccable so I’m being patient, he’s all over this stuff for sure. I’ve sourced based around the power state so my PF & my Backglass both remember without intervention, and the DMD will be a decased laptop monitor so, that is on when it gets power, then I just use a bunnings smart power board with all of them powered by the one PC switch getting power. Seems to be working so far

I’ll be getting the bloke next to us ( a SS fabricator ) to make my lockdown as well, mine is just shy of standard sizing, so, so be it. ( seems to work out way cheaper anyway than getting an OEM with our freight costs and our dollar to be honest ! ) That reminds me though I do need to get hold of a lock down mechanism so he has something to fabricate to .. before I fit all the front panel stuff .. bugger. How deep is a standard lockbar I feel like it’s about 75mm ( 3″ ) or maybe a bit shy of that ?
Cheers,
al.
You need to login in order to like this post: click here
August 16, 2016 at 5:50 pm #34750Sounds like a trip to your local Timezone with a tape measure might be in order? lol
When I was planning mine I was at my local club marking Shrek’s flipper positions on a table napkin ;)
You need to login in order to like this post: click here
-
AuthorPosts


Forums are currently locked.

